Writing a good, solid paragraph is the basis of writing composition. In fact, the ideas we teach our elementary students about paragraph writing will be used throughout their lives. Secondary school research projects need good paragraphs. College entrance essays need good paragraphs. Professional writing for any number of careers needs good paragraphs, too! So why not engage your students with something they love and make the concept of a good, solid paragraph stick? Teaching hamburger paragraph writing for elementary students using the hamburger style model is my favorite (and the most effective) way of teaching how to write a paragraph.
Teaching the Hamburger Model for Writing Using a Guided Approach
Over the years I have taught paragraph writing in many different ways. Some worked and some, well… not so much. One of the biggest things I’ve learned over the years is that teaching the paragraph as a whole and then sending my students off to write a paragraph is not the best approach. I now use a guided approach to teaching paragraph writing with much more success.
A guided approach involves breaking the task down into its parts and teaching each part individually. Once students have learned and practiced each part, then, and only then, do we put it all together to develop a full understanding of the topic. Here’s what it looks like in my classroom.
Introducing Hamburger Paragraph Writing for Elementary Students
On the first day, I love to engage my students with the hamburger. I mean, who doesn’t love a good, juicy hamburger? We will spend some time talking about hamburgers and what makes them so special, inviting their favorite restaurants into the discussion. We chat about our favorite hamburger toppings. And then, just about the time our mouths are watering, I let them know that hamburgers can teach us something too!
This is when I introduce the learning topic of paragraph writing. Depending on the grade level, the paragraph writing process might be something new or might be something they were introduced to the year before. Either way, our focus becomes learning to write a cohesive paragraph using the hamburger paragraph method.
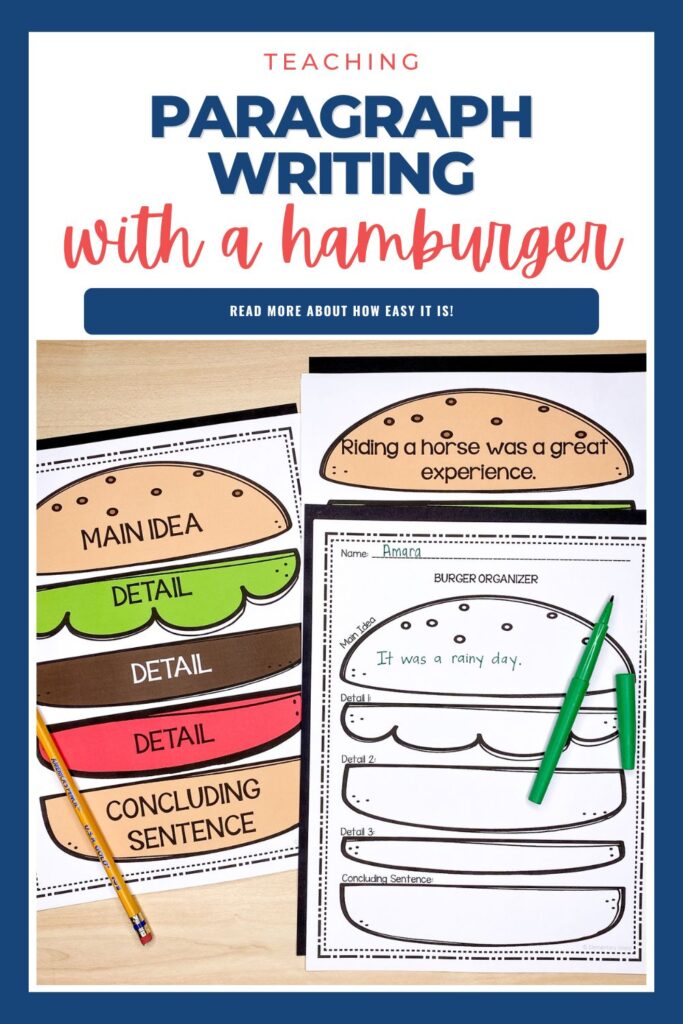
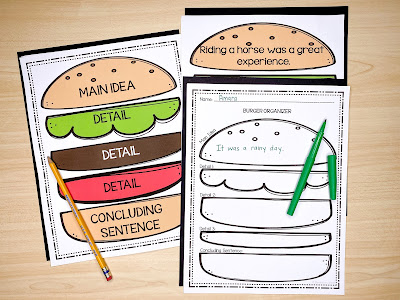
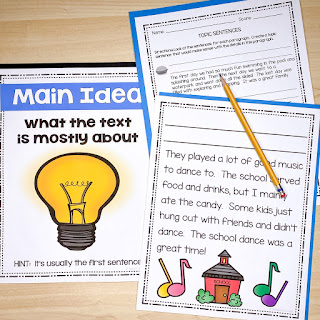
Then, I begin by showing the students the hamburger paragraph graphic organizers. As we look at the model we identify the different types of sentences that make up a paragraph. Our focus will be the main idea (introduction sentence), supporting details, and the closing or concluding sentence.

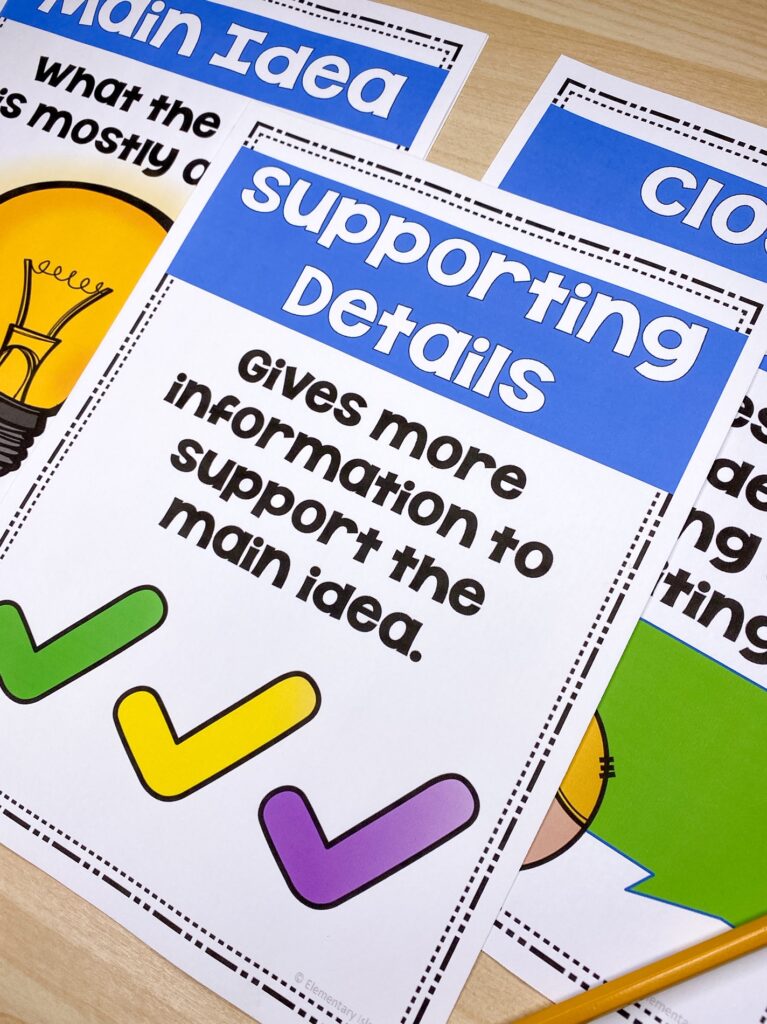
One of the first learning tools we use are these anchor chart pieces or posters for each sentence type. I have found this to be really helpful so that as we continue all students have been exposed to the same terms and language. We use these posters throughout the paragraph writing unit. They hang in the classroom as a reminder and learning tool for the students.
Focusing on the Main Idea
We begin with the topic sentence or the main idea of the paragraph. The main objective here is for students to understand that a paragraph is a group of sentences about one topic. The main idea sentence describes the topic of the paragraph. We go back to the full hamburger graphic to reinforce what the main idea does.
To help my students understand this concept we play a little game. I read or say complete sentences and my students tell me whether it would be a good main idea sentence. Some examples might be:
- Elephants are amazing animals. {Yes – this is a main idea sentence}
- An elephant has four legs. {No – not a main idea sentence}
- Percy Jackson has an adventurous life. {Yes}
- Percy Jackson went to Olympus and met Zeus. {No}
Once my students are doing a great job identifying main idea sentences, we then take our game to the next level. I give my students a general topic, like ‘animals’, and they brainstorm a different main idea or topic sentence that could be used.
Students then practice doing this on their own or with a partner. It’s always fun to read some of their independent answers aloud for the class. This is a great way to show that there are many ways you can reword the same main idea.
A quick review of student answers gives me a really good idea of whether the class is ready to move on. If students need more practice, you should pause here and try other ways to teach the main idea to your students. Main idea is such an important concept in reading and writing that you want to make sure your students fully understand the topic.
We finish our lesson on main idea or a topic sentence with students practicing. We use the topic sentence worksheet to have student practice writing their own topic sentences for a provided paragraph.
Finally, we work on listening to a paragraph that doesn’t have an opening sentence. After hearing the paragraph we work on writing a good topic sentence for the paragraph. Not only does this help students work on writing the main idea in the form of a sentence, but it also helps them see how the different types of sentences in a paragraph work together.
Supporting Details
After a quick review of the main idea, we will next cover supporting details. The goal is for students to understand that supporting details give more information to explain and support the main idea. Before jumping in with sentences, we start with a hamburger. I start by holding up the top of a bun (real or a picture – both work). Then I ask my students if this is a hamburger? Obviously, the answer is a resounding NO! Then, I ask the students a simple question, “How do you build a hamburger?” The answers are pretty straightforward: bun, meat, cheese, ketchup, lettuce, tomato, etc.

Next, I ask the question that will connect building a hamburger to supporting details. I might say something like “What about the mashed potatoes?” To which my students usually stare at me like I’m crazy. Inevitably, someone will say something like ‘Mashed potatoes don’t go on a hamburger!’ And that is what I’m waiting for! I explain that they are absolutely right. And just like we build a hamburger with hamburger ingredients, we have to choose supporting details that support our main idea.
We again start by practicing this skill as a class. We start with a main idea sentence like “I had a horrible sick day.” I used this sentence, typed it out on a top bun, and displayed it on the board. Then I read a variety of other sentences and the students decide if the sentence supports the main idea.
For each sentence that does support the main idea, I display it on the board under the main idea. As we do this, students can see the progression of building the hamburger with a main idea and supporting details. Sometimes I may print these out and place them in centers for students to manipulate. I’m a fan of hands-on student engagement.
We do this a few times with different main ideas to give the students practice with identifying good supporting “juicy” details.
Another way to do this is to provide two main ideas, that are similar in context but different. For example, you could use “Riding a horse was a great experience.” and “Riding a horse is very scary.” Then as you read supporting detail sentences, students can choose which main idea the sentence best supports. This is really great if your students have experience with multi-paragraph writing. This activity shows them how they can break down different aspects of their topic to have multiple main ideas through multiple paragraphs.
The next day we tackle supporting details again. But this time our focus is on making sure that the supporting details are relevant to the main idea. I remind the students of the mashed potatoes from the day before. We talk about how mashed potatoes with a fried chicken dinner are great. They are relevant to completing that meal. But mashed potatoes on a hamburger just don’t work. They are not relevant even though they are a food and we could put a spoonful on the burger.
Like the mashed potatoes, even though it is possible to add them to a hamburger – we don’t. The same goes with supporting detail sentences. There may be sentences that relate to the main idea but that are not relevant. To help students understand this better we do some examples together.
I give students a topic sentence and a few supporting detail sentences. They then choose which sentences are relevant and which are not. We talk about what makes them relevant and why some sentences just don’t belong with this main idea.
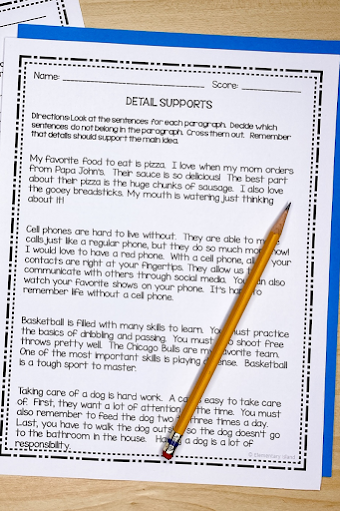
After our group practice, students worked on this worksheet to practice taking out the sentences that were not relevant to the paragraph. Students can do this independently or with a partner. If they work with someone I have them explain the reason why they don’t feel a specific sentence is relevant.
After a few days of working on the main idea and supporting details, the students usually have a good understanding. If, however, your students are struggling with the concept, again, I would encourage you to not move on. There are amazing main idea and details worksheets to help assist with this progress.
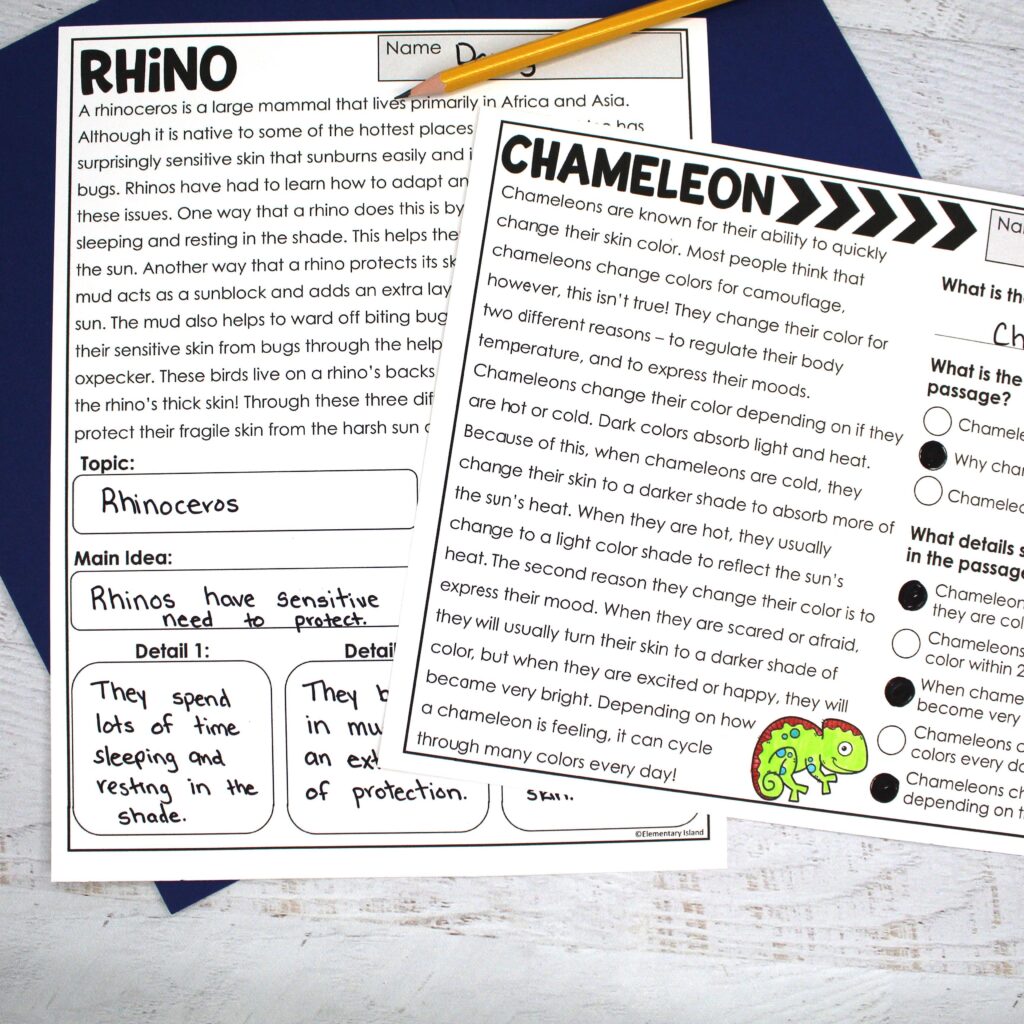
MAIN IDEA & DETAILS SAMPLE FREEBIE
These main idea and details worksheets offer a perfect combination of practice for students from identifying the main idea and details from a set to writing them in on their own!
Concluding Sentences
Once students have a good grasp on the main idea and supporting details, it’s time to add the final bun to our hamburger. The bottom bun represents our closing or conclusion sentence. As I introduce the concluding sentence we talk about how the buns of a hamburger are what make it easy to eat. They hold together all the ‘messy’ stuff in the middle. While you could eat a hamburger with just one bun, it’s not quite as neat or convenient as with two buns. Just like the buns of a burger, the first and last sentences of a paragraph really hold the paragraph together for the reader.
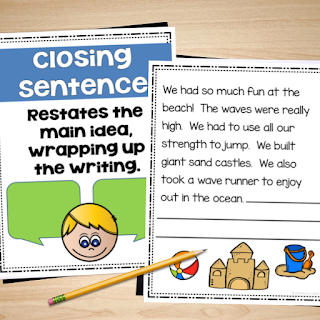
Students usually pick up the concept of concluding sentences quickly because they are similar to the main idea sentence. We talk about how rewording the main idea into a concluding sentence wraps up the paragraph.
We practice doing this with some simple paragraphs that are missing the closing or concluding sentence. After reading the paragraph we first identify the main idea sentence. Then we talk about ways we can reword the main idea into a conclusion.
That leads us right into our final lesson on closing sentences. We talk about different ways to make our closing sentences really good. I do this by introducing students to . . . the clincher!
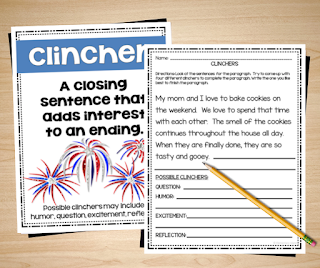
The clincher is a way to make the closing sentence interesting – and not just a repeat of the main idea sentence. Students learn that there are a variety of ways to write a good clincher. These are the ones that I teach my students:
- asking a question;
- humor;
- excitement; and
- reflection.
We dig into each of these types of clinchers by writing different sentences for the same paragraph. The students love using their creativity to come up with good clinchers!
Applying the Hamburger Structure to Writing
After learning about all the parts, it’s time to put the pieces together and start working on writing a good paragraph. So many times in the past, this is where I would start. As I look back now I see how much important learning my students were missing. It’s just one of the many things that makes me remember the value of learning in baby steps.
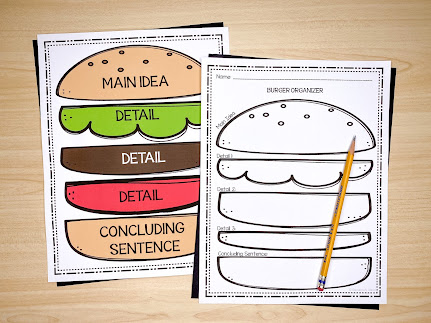
We finish up by going through the entire process again, together. But, we do this in steps too. I give students a very general writing topic just so that we all have a place to start. Then using the hamburger writing templates, we write out one sentence at a time using the hamburger model as a guide. Once students have completed the hamburger paragraph template they write their final paragraph.
Students also use a rubric to guide them through writing their paragraph. This helps them to remember the details and what to include. Before you know it, students will be writing their own paragraphs with very little guidance!
This hamburger essay guided paragraph approach has been very effective for my students and I know it will be with yours too! Keep the finished product in a writer’s notebook to show growth throughout the year!
Hamburger Paragraph Writing Unit
As a teacher, you are more than qualified to put together an amazing paragraph writing unit using these or other ideas. But if you are looking for some time-saving resources to help students in mastering the hamburger paragraph, this Paragraph Writing Lessons Resource may be what you’re looking for. This resource is perfect for 1st grade, 2nd grade, 3rd grade, and any remedial students.

This ready-to-use resource includes everything you need to teach an entire paragraph unit using the paragraph hamburger model. You receive anchor charts and posters for the different types of sentences, the hamburger model, example paragraphs for guided practice, no prep worksheets for independent practice, the hamburger writing organizer, the coordinating paper for the final draft, and the grading rubric. All of this for the price of a Starbucks drink! You can find this Hamburger Paragraph resource in my Teachers Pay Teachers store.
Save these Hamburger Paragraph Writing Ideas
Not quite ready to add these ideas to your lesson plans? Just pin this to your favorite classroom Pinterest board so you can quickly come back when it is time to teach paragraph writing to your students.